Monday, February 23, 2015

HOW TO HACK FACEBOOK USING KEY LOGGER

http://adf.ly/13xG0b

Today my job is

to take a very hot tutorial

on how to hack facebook

with keylogger,alot of

people have been sending

me mail to post a tutorial

on how to Hack fb,

hope u will love it.

Keylogger to hack into

anyone’s facebook

account. Keylogger does

more than hacking

facebook account

password. This

keylogger will mail you

all the saved

passwords on your

victims PC to your Gmail

account. As Most

facebook addicts do

save their password in

their web-browser,

there is high possibility

that you will get

facebook login details.

with this the

keylogger will also mail

you all the information

about your Victim. This

information includes

Screenshots, opened

window details, visited

websites and much

more.

Not all hacking

softwares and

keyloggers are Anti-

Spywares Shielded.

Most Antivirus

Softwares are familiar

with these free

keyloggers and they

might flag this

keylogger as a Virus. So

to experience this

keylogger you might

need to temporarily

turn off your antivirus

or uninstall it. But Don’t

worry, if your victims

antivirus is not up to

date or freeone, there

are high chances that

you may end up getting

his keylogs. So give it a

Try.

Recommended: Buy

Antivirus shielded  click here to download

http://adf.ly/13xG0b

that operates in

stealth mode!

-Features of

Emissary

Keylogger:

Can mail all the

Keystrokes including

login details

Can send screenshots

of the victim’s Screen

Can Block VirusScanning

Websites on victim’s

computer

Can Disable

TaskManager on

victim’s PC

Can Disable Regedit on

victim’s PC

-How to hack facebook

password with keylogger

First make sure you

have ‘Microsoft’s .net

Framework‘ installed on

your PC, if you dont the installed from here click here to download

have pleasedownload and

install it. [*] The victim

need not have .net

framework. Follow the

Steps below:

Step 1: Download

‘Emissary Keylogger‘

Software and extract

the files to desktop. If

your Antivirus deletes

the file, then please

turnoff your Antivirus

or uninstall it and try

downloading again.

Step 2: Run

‘Emissary.exe’ file and

enter your gmail

account details, so that the

password and other info

of your victim can

be mailed to you. If you

are afraid of entering

your gmail details, then

do create one

temporary fake account

and enter those details.

Step 3: After you enter

your ‘Gmail account’

details Click on ‘Test’ to

test the connection to

your Gmail account. In

the Server name Field

you can change the

name if you want. enter

any Time Interval in the

interval field. This timer

controls the time

interval between two

keylogs emails. You can

also show fake error

message to your Victim

when he clicks your

server.exe file. to do so

enter the error title and

description in the ‘Fake

error message’ field.

Step4: Now after filling

the required fields, Click

‘Build’ button. This will

create another file

called server.exe in the

same directory.

Step5: Now send this

server.exe file to victim

and make him install it

on his computer. You

can use Binder or

Crypter to bind this

server.exe file with say

any .mp3 file so that

whenever victim runs

mp3 file, server is

automatically installed

on his computer

without his knowledge.

also read: How to

change ICON of .exe

file?

[ * ] Now because this

is a free keylogger, you

can’t send server.exe

file via email. Almost all

email domains have

security policy which

does not allow

sending .exe files. So to

do this you need to

compress the file with

WinRar or upload it to

Free File Storage

Domains, like Mediafire,

rapidshare, filethief etc.

Step6: Once the victim

runs your sent

keylogger file on his

computer, it searches

for all the stored

usernames and

passwords and it will

send you email

containing all keylogs

and screenshots

regularly after the

specified ‘Time interval’

NOTE:This post is for

educational purpose only.

Please help invite ur

friends to the group

IF U LIKE THIS POST SHARE IT WITH YOUR FRIENDS

TODAY MY TOPIC IS HOW TO ROOT ANDROID MOBILE

V3Root 1.7. is the best rooting software for any kind of android device in single click. The Vroot tool developed by Mgyun in China. But don't worry VRoot english version also now available to download.Tiny tool and easy to use.  The latest version of VRoot download compatible with 8000+ Android devices and support for newest versions of android. This is windows based tool so you need to have PC running windows. Download VRoot latest version via our direct download links by using below button.it's completely free


System requirements of VRoot download 

click below to download 

http://adf.ly/13xEMP

A Computer running on windows OS USB cable to connect PC and the android device. Install USB drivers. Clock Work Mode (CWM) not needed. You must charge your phone battery to at least 50% before proceed.
How to root any android phone with VRoot tool - Step by step guide

Step 1 - Backup all the data on your device before start the vRoot process. Step 2 - Download the android VRoot tool using above link and install. NOTE: If you are Non-Chines please use vroot english version Step 3 - Enable debugging on your android device.(Settings-->Developer options-->USB debugging) Step 4 - Open the VRoot software on your computer. Step 5 - Connect the PC and the android device. Step 6 - Once you connect the device and pc it will automatically detect your smart phone. Step 7 - Then click the "Root" button to start the rooting process. Step 8 - Device will reboot automatically and confirm by the Vroot software

IDM 6.21 Full Register Version Free Download


IDM 6.21 Full Register Version Free Download


http://adf.ly/13x94Y

iFree Skype Recorder Your 100% FREE Skype audio call recorder

iFree Skype Recorder is a powerful and easy-to-use tool for recording Skype calls. You can free use it to record 
any Skype calls' audio streams.


It has the following advantages: 


  • - It's FREE with no limits attached.
  • - Automatic or manual recording capabilities.
  • - Easy to be used in recording any type Skype calls's audio streams.
  • - Choice to record Skype calls different side(Local/Remote).
  • - Store your any Skype calls to MP3 format (Using Lame MP3 Encoder).
  • - Automatically chat reply when you leave computer.
  • - Easy to track record history.
  • - Built-in mp3 player.
  • - Very easy to use. 


Installation instructions

  • 1, Double click the iFreeRecorder.exe file you have downloaded. Click the "Next" button in the window of the installation program until navigate to the last page. and make sure you have Skpye installed.
  • 2, iFree Skype Recorder will try to connect to Skype on the first start, and will be waiting for authorization. 3, Click "Allow Access" button to allow iFree Skype Recorder to use Skype when it pop up below message on the Skype.
  • 4, Click "Start Recording" button to record the Skype call when the call connected                                                http://adf.ly/13x4HA


Sunday, February 22, 2015

How to Boost Torrent Speed in uTorrent (and Other P2P Clients Too)

In this post I am going to discuss some tips and tricks on how possible you can improve the speed on your torrents using p2p client such as utorrent.
1.) First of all you should have a torrent file with good seeders. Without seeders, there is nothing to expect

2.) Optimize your internet speed

  • First Check your internet speed at SpeedTest.net and get an idea about current speed of your connection.
  • Download TCP Optimizer which is a freeware you can use to optimize your connection. After download it, run it (no installation is needed) and change the connection speed bar according to your connection. Do not use a higher number rather than your actual connection, which won’t work. 
  • 3.) Improve your uTorrent client for better speed

    • Go to Options –> Preference –>Connection –> Set “Port used for incoming connection” above 10000 if not. (You can use the random port button too)
    • Go to Options –> Preference –> Connection –> Uncheck Randomize port each start check box
    • Go to Options –> Preference –> Bandwidth –> Set “Maximum Download Rate” something a little bit higher than your actual speed in kBps .
    • Go to Options –> Preference –> Bandwidth à Set something higher like 999999 in the global maximum number of connections and maximum number of connected peers per torrent  text box.
    • Go to Options –> Preference –> Bittorent –> Check“Enable DHT Network”, “Enable DHT for new Torrents”  and “Enable Peer Exchange” check boxes if not.
    • Go to Options –> Preference –> Bittorent –> Set Outgoing in Protocol Encryption section Enable and check “Allow Incoming legacy connections”
    • You can maintain a high speed peer list and use them manually if you lost connection with those  peers. (Check this step by step guide)
    Additionally, you can use some torrent speed accelerator software also to speed up your p2p clients. For uTorrent you can use uTorrent Ultra Accelrator. Install and run it when you use uTorrent. Remember to select the correct internet connection from Network Interface Dropdown.

You can check other products too at TrafficSpeeders.com for your favorite p2p file sharing client other than UTorrent such as BitTorrent, Azureus, BitComet, BearShare, Vuse, eMule and many more. Another website called Webspeeders.com also offers similar products as TrafficSpeeders.com.
Even if you have tried above tweaks and still could not get any success then there may be some other reasons to fail such as,
  • May be your ISP do the limits on torrent traffic even encryption is enabled in the protocol
  • Bad seeds peers ratio
  • Downloading the torrent using unreliable, malfunctioned public trackers, etc.
Additionally, at the beginning, you can give a try on several torrent files on the same file you need to download, and you can filter a good torrent file by seeds and peers count and continue with it which may solve some issues at least. 


Tips to Edit/Unlock PDF files


Nowadays, PDF files are the most preferred mode of transferring / sharing documents with safety. This is because of its portability and compatibility with a large number of programs. For protection purposes, people tend to assign passwords to their document which can be done in two ways in the case of PDF amongst which Owner Password is the most commonly used protection methods. Even though one has the access to open and view documents easily in Owner Password protected view, but when it comes to editing, modifying, copying or extracting the content of the PDF it becomes a difficult task. The one discussed here is the Owner Password which restricts the features like editing, copying, and printing of PDF documents. However, the other one is User Password which completely restricts the users from even opening the document. In order to access the restricted features of PDF document a work around with some methods are given below.
Solution Cracked With Some Known Methods
Through Google Drive
With your free Google account, there is a feature called Google Drive can help you to unlock the PDF document. It unlocks the uploaded PDF file. Then converts the text of the PDF and saves it as a test document. However, one can find that the original formatting of the PDF documents is not maintained. Moreover, Google Drive has a restriction of uploading files, i.e. 2 MB per file. Therefore, we cannot upload very large PDF files. Hence, this method is certainly not the best option.
With Adobe Acrobat Pro
With the Adobe Acrobat Pro, all the restricted features of PDF like; editing, copying, modifying, and printing are removed immediately. For gaining access to the restricted features of PDF, one has to know the User Password which, in other words is known as the document open password.
Although, one can get access to the password restricted features of PDF easily, but getting a licensed version of Adobe Acrobat Pro is too expensive.
Free Online PDF Password Removal
A number of online solutions are available which offer a free way to unlock the password feature of PDF documents. However, there are some or the other drawbacks associated with those online solutions.
  • One of the common problems noticed with these solutions is that it requires administrative privileges each time for no reason.
  • The online free application stores the uploaded PDF document in their own database while unlocking the PDF password. So, there is a probability that any confidential and important information associated with PDF files is going to be in the wrong hands and may probably get leaked.
  • Some applications are too heavy when it comes to the consumption of internet bandwidth to upload the PDF file and they perform the PDF unlocking process with bandwidth consumption done on a large scale.
  • Another major limitation of the online free PDF password removal tool is that, they usually ask for your email ID. This information is generally shared by other groups and is used for spamming, which can be too bugging for most users.
Considering the pro and cons of the all the above methods, it is better to go for a third party solution. There are numerous third party solutions available in the market, but PDF Unlocker utility is one of the most dependable tools.
Move Over To An Instant Solution For Unlocking PDF
PDF Unlocker Tool removes all kinds of file restrictions like copying, editing, extracting, and printing by unlocking the security feature embedded by Owner password. The trial version of the software is available for free and works lifelong. It removes the restricted features from the PDF documents, but while saving the document, you will find the output document watermarked with the company’s name labeled on it.

How to Recover Files on your PC using MiniTool Power Data Recovery


As a Windows data recovery program, Mini Tool Power Data Recovery can help recover files which are lost due to different kinds of logical errors, such as mistake deletion, formatting, and virus attack. And its personal license introduced today allows us to recover unlimited files. Next, let’s have a look at this program.
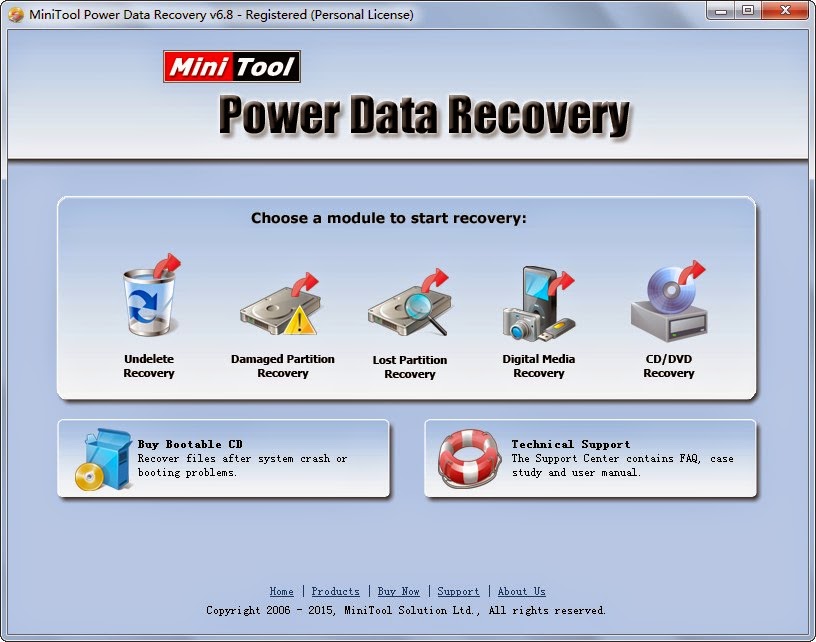
We need to cost $69 to purchase the single data recovery program or $79 to buy both Windows version and boot-able disk from its official website, and then pay for it via credit card, Paypal, Wire Transfer, Fax Order or Check/Money Order. After the payment is authorized, we will receive an email that contains download link and license key. Then, download and install the program to any of partitions where data loss does not emerge, which is to prevent lost data from being overwritten. Next, launch the powerdatarecovery.exe file to get an interface where license key is required, and we only need to copy and paste the key to register. After successful registration, the following interface will appear: 

Here are 5 data recovery modules:
  • “Undelete Recovery”: recover simply deleted and shift-deleted files;
  • “Damaged Partition Recovery”: recover data from formatted/reformatted/RAW device or partition, and restore data from the device Windows asks to format.
  •  “Lost Partition Recovery”: recover data from deleted and lost partition.
  • “Digital Media Recovery”: scan and recover digital media files only.
  •  “CD/DVD Recovery”: restore data from logically damaged or physically damaged CD and DVD. 
Now we take recovering deleted files for example. Firstly, choose the “Undelete Recovery” module to get the interface below:

                                   Then, select the partition or device where data loss appears and click “Recover” to scan it. After scan, deleted files will be listedNote: we had better not save these files to its source partition or device, for it may overwrite lost data, and the overwritten data cannot be recovered any more.
After these steps, to recover deleted data is completed. 
Moreover, MiniTool Power Data Recovery Personal License also contains a boot disk which helps recover data when Windows cannot boot. First of all, download the bootable media builder according to the provided download link from another computer. Then, launch the builder to register and burn the program (http://www.powerdatarecovery.com/data-recovery-boot-disk.html) to CD, DVD, or USB flash drive. Next, boot the crashed computer via the boot disc to get the interface below:

Just check the ones which need recovering and click “Save Files” button on the left pane to appoint a location to save all these recovered files
Note: we had better not save these files to its source partition or device, for it may overwrite lost data, and the overwritten data cannot be recovered any more.
After these steps, to recover deleted data is completed. 
Moreover, MiniTool Power Data Recovery Personal License also contains a boot disk which helps recover data when Windows cannot boot. First of all, download the bootable media builder according to the provided download link from another computer. Then, launch the builder to register and burn the program (http://www.powerdatarecovery.com/data-recovery-boot-disk.html) to CD, DVD, or USB flash drive. Next, boot the crashed computer via the boot disc to get the interface below:


Now we can choose one of modules to recover lost data. 
Nevertheless, MiniTool Power Data Recovery Personal License is not perfect. For example, we can only use one copy of software on one computer for none commercial environment; it is incompatible with Windows Server. 
Finally, we hope this post is useful when you are planning to purchase MiniTool Power Data Recovery Personal License.